How to concept -Half Life Warehouse
Hi!
On this page I will be running a breakdown of a concept I have done which would then later be used to produce final product in UE4.
It just the process for getting past the design stage and having a more refined overview of how you want something to look a.k.a a Concept of an environment.
Workflow Breakdown - What I will do and how I spend my Time

This is a pretty standard base workflow for most studios I have worked in/ for or at least a very generalised idea. The number are arbitrary but help to convey the importance of each process.
The complexities for each area are handled in house and this is purely from an artists perspective, the code boffins have their own pipeline and if you are lucky it will even include products from your art pipeline. ^_^
Concepting and Blockouts should be fairly quick stages. The point is to convey the idea of the scene across including colours, shapes, positions, scales and overall theme.
The main body of work with it own sub pipeline will be the actual Asset creation. This takes the most amount of work especially for a small studio or a single player development like this project. You need the assets to look good so the lion's share of time and effort should be poured in here.
Lighting can make or break an asset or scene. Bad lighting can make everything look flat, uninteresting and can generally highlight your work in a negative way. Spending a chunk of time dedicated to lighting passes is a must before the final push to present your work.
Presenting the final piece is the end goal, so it makes good sense to give a visual improvement pass on the work. Polishing the camera positions, camera fly through, particles, lighting, Post process look, colour corrections, composition for renders and over all a neat little package your work can be presented to the wider world needs time. Spend some time doing this and the improvements it makes to your work can be phenomenal.
Concepting
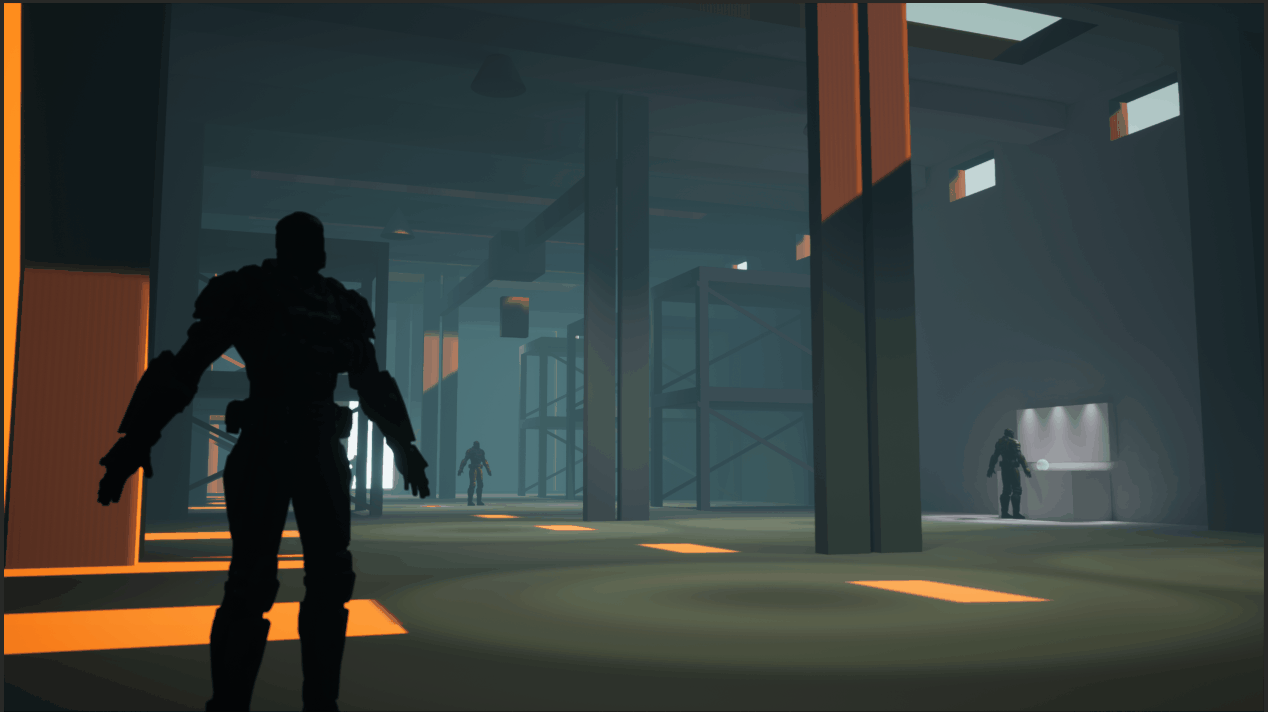
So here is the kind of concept I would want to see at minimum. It tells me a whole bunch of stuff for how the scene needs to look and feel as well as a good idea of the sort of assets in the scene the make the bulk of the shapes. Even if the letter E is missing from the word Zone, I can use this piece to make a scene: -

Now I'm no concept artist. My skills are extensive and varied but traditional painting isn't my jam.
So how did I go about making this scene? Well I sort of combined a part of my block out stage with my concepting. I do this sort of thing to help me get allot of the heavy lifting out of the way, in this case setting the environment up to be populated. For that I used Unreal Engine's heavily underutilised BSP brushes to smash out a stage for me to work with. The technique is commonly found in VFX Film concepting pipelines, I just borrowed it for my work.
Step 1: BSP
Now I said heavily underutilised and well that is because BSP isn't really used so much in workflows any more or at least seemingly people are resistant to using it for some reason. Buuuut i'm not a team of people and like I said using this method allows me to create some good perspective shapes for my concept.
Step 2: Shape inclusion
I want some of the more complex larger shapes in there too. So adding some simple meshes I have knocked up in 3Ds Max (Maya is fine too, they are both the same thing these days for 3D modelling).
With the addition of some more elements too some BSP shapes you can build a very simple work frame for the Concept art.
Step 3: Composition
So I threw into the scene a Cinematic Camera and played with some settings. I set myself to pilot the camera so i can control the position of the shot with much more accuracy then by playing with rotation and position numbers.
A quick play around with a Colour Look Up Table (CLUT) in the Post Process Volume I have in the scene (set to unbound to affect everything) and I'm ready to render this for Photoshop fun.
Step 4: Photoshop the living daylights out of it.
MINI RANT: So at this point in my career as an Academic at University I have seen 0 out of the 7,500 ish students I have taught, very few willingly try to actually concept their scene/ character/ vehicle/ weapon/ anything design based; after repeating the directive 8 times or more eventually Ill see a forum thread with some efforts towards doing a paint over.
It is frustrating. Aim to concept something better looking and higher quality than my piece and you will be in a good position for later glory!
Doing this now means I have a clear plan of how I want my scene to look. Granted this particular one lacks a heroic overtone and has the perspective but I don't need it to have one for this piece (because i'm lazy) .


Grey Box
So I already have some of the scene blocked out (woo! forward planning and efficiencies) and my concept is based on those large shapes already included in the scene. This means for the blocking out stage (grey boxing) I can generate more primitives and low end complex assets to fill in the places for the rest of the work I added in the concept stage. The process during the modelling stage will be to create the high poly assets and replace them with their optimsed low poly assets later on.